
Another type of Cascade document you can create is a profile. Here you will learn how to create, name, and edit profiles, as well as create profile listing pages. Here are two examples of profiles:
"Add Content" Method
- Navigate to and open your website's folder from the Site Content panel
- Note: If you do not see your website in the "Add Content" menu, or if you do see your website yet don't see the particular document type you want to create, then you can ask ITWeb to set that up for you. If you do not want to have this set up for you, you may use the "Copy Existing Profile" method below.
- In the top-left corner of the page, select: Add Content > [your website] > Profile
- Name the file and choose a placement folder
- Note: Remember, new files should NOT be placed in "_blocks" folders since those folders are reserved for blocks only.
- Click "Check Content & Submit" in the vertical ellipsis
When to use the "Add Content" method: You will tend to use this method because it is an easy and clean way to create a profile, as long as ITWeb has already configured these options.
Documents that already exist on a website can be copied to produce new documents for editing.
- Right-click on the profile
- Click "Copy"
- Name the file and choose the placement folder for the file
- Make sure it remains in the same folder that the source profile you copied was in (this should be the case)
- Click "Copy"

Profile file names should follow the format lastname-firstname. For example, James Madison's profile file name would be madison-james, which should be entered in both the Display Name and Title fields.
Good profile names:
- smith-john
- doe-jane
Bad profile names:
- John Smith (Do NOT use spaces, capital letters, or formats other than lastname-firstname)
- Doe, Jane (Do NOT use spaces, capital letters, or special characters like commas)
- faculty-smith (Do NOT use faculty/staff classifications in the file name)
- smith-john-assistant-director (Do NOT use titles in the file name - titles may change over time)
Place all profiles in your main website folder under a folder named "people." If you do not already have a "people" folder, refer to creating folders.
Profile images have their own special class that formats them as circular images. This means that you must upload an image to the Thumbnail Image field that is 200 x 200px (square) for the image to display correctly. If you do not upload an image, a default profile image will display.
Personalized Profile Image
If you are using a personalized profile image and want to upload it before creating the profile, select: "Add Content" button > _Responsive > Profile Image 200x200.

This will create a profile image file that you can upload a 200x200px image into. Change the profile image file name and placement folder. You will need to save your profile images to your "_images/[your website]" folder. You may want to create a folder inside your images folder for profile photos.

Follow these dimensions for profile images:
- Must be 200 x 200px
- Resolution must be 72dpi
- Recommended file format is .jpg with quality of 8
Generic Profile Image
If you do not have a personalized profile image to upload, just do not specify a Thumbnail Image in the profile and this generic profile image will show:

Optional Fields
There are several optional fields available to edit in a profile that appear next to the person's image. If an optional field is not completed, the field will not be displayed.
- Name
- eID
- Position
- Year Started at JMU
- Website (include full URL with "https://")
- Curriculum Vitae (see information below about adding/updating CVs)
- Preferred Pronouns
WYSIWYG Content (optional)
Profiles also have a standard WYSIWYG editor where you can add information about the individual.
Additional Content Sections (optional)
Additional content sections can be added to a profile, which allow for heading background colors and different section widths. These sections function similarly to multi-block WYSIWYG grid cells. Please refer to our documentation for multi-blocks for how to edit/add/remove these sections.
Curriculum Vitae can be added to individual profile pages using the document attachment field. ONLY PDF files should be used for Curriculum Vitae.

CVs should follow the naming convention "last-first-cv.pdf" and be placed in your department's
"_files/cv" folder.
Note: The CV PDF file MUST be published in addition to the profile or else the document will be a broken link. To publish the CV file, you can right-click on the attached CV and select "Publish".

Updating Existing Curriculum Vitae
Rather than adding a new CV document each time there is an update and ending up with different versions of the same document, you will want to edit the existing CV PDF file. Follow these instructions for how to edit a PDF in place.
You must use a "Profile role" tag like: _tags/Profile/faculty or _tags/Profile/staff to specify if this is a faculty member versus a staff member in your department.
Example profiles with tags for faculty/staff:
Add your departmental tag like this one: _tags/source/college-of-business/economics. If the faculty member teaches in multiple areas or disciplines, add all relevant tags.
Once you have created a profile, you will most likely need to create a profile listing page, where it lists the links to multiple profiles. There are two types of listing page that you will choose from when creating your listing page: a photo or a datatable listing page.
Photo Listing
This listing page format displays the individual's image, name and title. Here is a link to an example of a photo listing page: https://www.jmu.edu/cascade-examples/people/index.shtml
- Cons: requires a photo for each profile; limited information is visible before viewing the profile

Datatable Listing
This listing page format displays profiles in a sortable and searchable table.
- Pros: does not require photos for profile pages; allows for contact information to be easily visible without clicking into the profile itself; profiles can easily be sorted and searched

To create your own profile listing page, follow these steps:
Step 1: Create a new page
Create a new page (if your page currently does not exist)
Step 2: Copy and rename profile feed template
Copy the profile-feed-template folder to your website’s appropriate "_blocks" folder.
- Rename both files (department-folder-index and department-profile-config) within the profile-feed-template folder. Replace the word department with the title of your department and remove the capitalized section. For example, if your department is Economics, rename department-folder-index-PLEASE-RENAME-TO-YOUR-DEPARTMENT to economics-folder-index.

Step 3: Edit the file
Click on the "folder-index" file (which you just renamed to something like "economics-folder-index"), and then click "Edit" in the top bar. You can also right-click on the file and select "Edit" in the dropdown menu.
- Click the dropdown menu for "Index Type" and select "Index Folder." In the "Index Folder" field, select the folder containing the profiles. In this example, the folder is named "all-faculty".

Step 4: Specify the departmental tag
Return to the "profile-feed-template" and select "Edit" on the "profile-config" file. Specify your department’s tag for the "Departmental Tag" field (such as "/_tags/source/college-of-business/economics").
- To specify your department's tag, select: Choose Block > Browse > JMU >_tags > source > [your department] > [your departmental tag]

If your website contains multiple departments, contact itweb@jmu.edu for assistance.
Note: The tag’s "tag" value assigns names to headings. If the tag says "Economics," then your section headings will read "Economics Faculty" and "Economics Staff." If the tag says "Economics Faculty," your headings would be "Economics Faculty Faculty" and "Economics Faculty Staff."
Wiring the Profile Feed Files to the Profile Listing Page
Step 1: Add tags
On your profile listing page, add the departmental tag and one or more "Profile role" tags
- On the page, select "Edit" in the top toolbar
- Under the "Content" tab, scroll down to "Tags" within the "RWD Page" section (not the "Tags" section at the bottom of the page)
- Add departmental tag: Select "Choose Block" and navigate to your departmental tag (Browse > _tags > source > [your department file] > [your departmental tag] > "Choose" button)
- Add "Profile Role" tag: Click the "Add new field" green plus icon under "Tags", select "Choose Block", and navigate to the "Profile Role" tag (Browse > JMU > _tags > profile >faculty OR Browse > JMU > _tags > profile > staff)
- Note: Add the faculty and staff "Profile Role" tags in the order that you want the sections to appear on the page
Step 2: Wire profile-config to the page
Wire the profile-config file to a region (such as "REGION-02")
- On your profile listing page, select "Edit" in the top toolbar
- Under the "Configure" tab, scroll down to the REGION
- For Choose Block, select: Browse > JMU > [your website] > _blocks > profile-feed-template folder > profile-config
Step 3: Wire a format and configure the listing page
Wire a format to the same region as the profile-config file. There are two options. For Choose Format, select either:
- Browse > JMU > _shared-formats > profiles > photo-listing
- Browse > JMU > _shared-formats > profiles > datatable-listing
There are several configurations from which you can choose that will affect how your listing page is displayed.
- To change the order of the profiles on a listing page with photos, see the section entitled "Editing Profile Display Order" on this page (NOTE: datatable listings are sorted by clicking on the columns on the rendered page, so no external configuration is needed)
- To not show any links to profile pages in any profile listing, in the profile-config (or the manual-config) under "Profile Feed Options" select "hide-profile-links".
- To link to the campus directory instead of to an individual profile page, under "Profile Feed Options" select "show-directory-links"
Editing Profile Display Order
The folder-index configuration that you choose will display the profile listing in either alphabetical order or folder order:
- For alphabetical order: in the folder-index block, select "Alphabetical" for the "Sort Method"
- For folder order: in the folder-index block, select "Folder Order" for the "Sort Method"
If you wanted to have another pair of sections, like "Accounting Faculty" and "Accounting Staff" to appear below the Economics folks, just follow these directions again but with "Accounting" settings instead of "Economics" settings, and wire up the profile-config to the next region down.
Reordering Profiles listed by Folder Order
If your profile listing page is listing profiles in folder order, a new faculty/staff profile may not appear where you want it to on the listing page; instead, it may appear at the bottom of the section. If this happens, you will need to edit the folder order. You can control the order of profiles by following these steps:
- Locate the folder containing profiles in your website
- Right-click the folder and then on the pop-up menu click the link below "Name"
- In the folder view, use the arrow to the right of "Order" to sort profiles by position
- Select a profile and use the up and down arrows at the top of the list to move it to a new position (you must click Order first for these arrows to appear once you've selected a profile)
- Publish the profile listing page (index page) to view changes
For more information about editing folder order, see Reordering Assets.
Some faculty and staff profiles are separated by section folders, like this example with the sections: adjunct faculty, emeritus faculty, and faculty.
NOTE: Never use this to move profiles across different departments, but you can move files to a "z-archive" folder this way.

If a profile in faculty needs to be moved to the adjunct faculty folder:
- Right-click on the page in the "Site Content" panel and select "Move"
- Specify the new folder destination
- The checkbox for the live site [ www.jmu.edu ] should be checked by default under "Unpublish Content"
- Click "Submit"
You should see a pop-up message: "Move and Rename successful" - Republish the profile page and profile listing page
Manually creating profile listing pages is useful if you have a small number of profiles (20 or less).
Follow these steps to manually create profile listing pages:
Step 1: If needed, create a "people" and "_blocks" folder
Note: If you already have a folder for your profiles you can skip this step.
- Create a folder by selecting: Add Content > _ALL > Folder
- Name the folder "people"; this folder is where you will place your staff and faculty profiles
- Within the "people" folder, create a "_blocks" folder; this folder is where you will place the Profile Listing - Manual block
Step 2: Add Profile Listing - Manual Block
- In the _blocks Folder inside the folder where your profiles reside, add the Profile Listing - Manual block by selecting:
Add Content > _Responsive > Profile Listing - Manual Block - In the “Profile Group” grid cell, fill in the Heading field (example group names are “Faculty” or “Staff”, but you can name them whatever you wish). Click the green + to add another Profile Group and fill in its Heading accordingly.
- Within a Profile Group grid cell, click on the “Choose File, Page, or Link” field and browse to a profile in the folder where your profiles reside; select the appropriate profile and click "Choose"

Step 3: Wire the profile listing block to a page
- In the top toolbar of the page you created in the previous step, select: Edit > Configure tab
- Scroll down to a Region and click "Choose Block"
- Select: Browse > JMU > [your-website] > [your profiles folder] > _blocks > Profile Listing - Manual Block
- In the same Region, click "Choose Format" and choose the format you would like to use:
- For a photo listing page, select: Browse > JMU > _shared-formats > profiles >manual-photo-listing
- For a datatable listing page, select: Browse > JMU > _shared-formats > profiles >manual-datatable-listing
- Click "Check Content & Submit" in the vertical ellipsis
It is permissible to delete an individual's profile page because faculty/staff occassionally change positions or leave JMU and there is no practical place for a profile to redirect. To avoid broken links, make sure to:
- Ensure there are no existing relationships to the profile.
- Republish the profile listing page where the profile appeared.
To see if the profile has relationships:
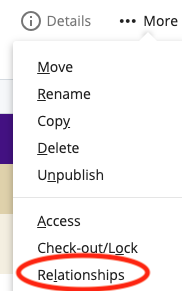
- In the page's top toolbar, click "More", and in the dropdown menu, click "Relationships":
- A window will open showing all the pages that have a relationship to the profile. If any relationships exist, you should edit these pages to remove links to the profile before deleting the profile page.
- When there are no relationships, you can proceed with deleting the profile.
To delete a profile:
- Select the profile you want to delete
- On the page toolbar, select More > Delete. Note: when you delete a page, it will also be unpublished by default.
- If the page still has relationships to other pages, you will see a warning message display.
- Click "Delete"
- Republish the profile listing page

