
An image gallery can be added to a page when you wish to display multiple images. In this tutorial, we will outline how to create an image gallery and change its appearance to suit your needs.
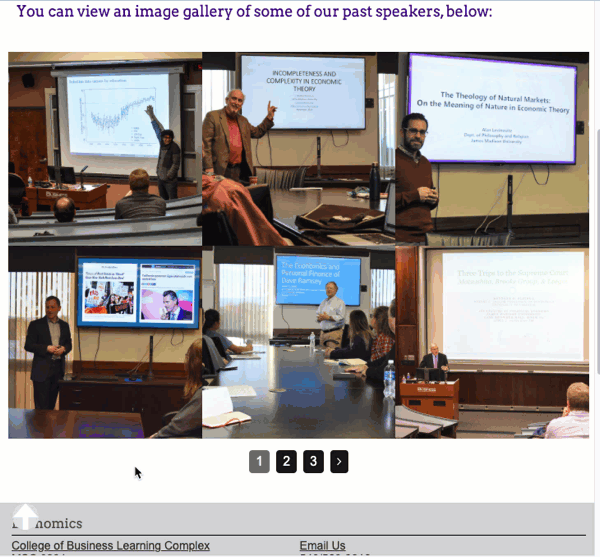
The example below shows an image gallery with 250px wide thumbnails and multiple pages.

Clicking on an image thumbnail from the gallery grid will open that image in a full-width lightbox display with an image description. In the full-width display, the user can also click to advance through the rest of the gallery.
- Copy the entire “RENAME-ME-gallery” folder from “_shared-blocks/listings” into a publishable section of your site. Do NOT place it inside of a “_content” or “_blocks” folder.
- In the Site Content window on the left, browse to your site and the “RENAME-ME-image-gallery” folder that you just created. Rename this folder to an appropriate name for your gallery. Example: “speaker-series-gallery”.
- Inside the gallery folder, rename the gallery-index block "rename-me-gallery-index" to match the gallery folder. Example: “speaker-series-gallery-index”.
IMPORTANT: Block placement
The location of the gallery index and configuration blocks is very important. DO NOT move them from their original locations.
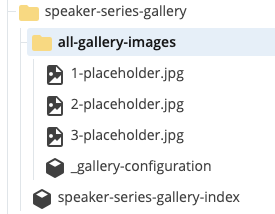
The gallery index-block must remain in the gallery containing folder (OUTSIDE of "all-gallery-images"):
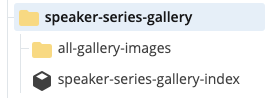
The gallery-configuration block must remain inside the all-images folder with the image files:
Step 1: Add the Image "gallery-index" to a Region
- Navigate to the page where you want to add the Image Gallery
- In the top toolbar of the page, select: Edit > Configure tab
- Scroll down to find the numbered Region you want to add content to
- Select the Region to display content in
- Click "Choose Block". In the window that appears on the right-side of the screen, you will see three tabs: Recent, Browse, and Upload.
- Click "Browse" and then select your image gallery index block.
- Click the "Choose" button.
Step 2: Add the Image Gallery format
- In the same Region, select "Choose Format"
- Choose the content format by selecting: Browse > JMU > _shared-formats > listings > image-gallery
- Click the "Choose" button
- In the vertical ellipsis, select "Check Content & Submit". Refresh your page and verify that your image gallery is functioning (if you haven’t added your own images, you should see the three placeholder images of campus).

Adding/Editing Images
Images can easily be added to your image gallery by placing them inside your gallery folder. Note: this is the SAME folder where the “_gallery-configuration” block is located. Any images placed inside this folder will be used in your gallery.
To remove the placeholder images, simply delete them.
Adjusting the Gallery Grid
The gallery grid that appears on your page can be adjusted by editing the “_gallery-configuration” block:
Max Number of Rows: This is the maximum number of thumbnail image rows that will appear on a page. For larger image galleries, you may wish to keep this number small and allow your gallery grid to have multiple pages.
Image Size: This is the image size in pixels of the image thumbnail that appears in the grid. The larger the image size in your grid, the fewer images will be displayed in each row of your gallery grid. We recommend keeping thumbnails 200px or larger.
Image Description
When you click on an image in the gallery grid, it will open up full width on your page and display an image description at the bottom. To edit the image description that displays:
- Open the image in Cascade.
- Click “Edit”.
- Type the description on the “Title” field and save the image.
- Republish the image(s) AND the page where your image gallery appears.

