Now that you have learned the concepts and creation methods of Cascade web pages, you will now learn how to properly upload general documents, like Microsoft Word files or PDFs, to Cascade documents.
Before uploading a document into Cascade, it's important to consider whether the content is best shared as a document (.docx/.pdf) OR on a webpage. Please use the Digital Accessibility Decision-Making Guide: Document vs. Webpage to help make these important decisions.
If you choose to upload a document, careful consideration should be made for which file type to upload. PDF documents tend to provide the best user-experience, as they can be viewed on any web browser/device, but they pose unique challenges for accessibility and updating/maintenance. Word Documents are easier for the creator to make accessible initially, but are software dependent and may not be readable on all devices.
1. Navigate to the document on your computer and select the file.
2. If the file name does not follow the general Cascade naming guidelines, right-click to rename the file. In the example above, the file needs to be renamed"cascade-user-guide-health-center.pdf" in order to eliminate the underscore, spaces, and capital letters.
Note: If you have a large number of files in Cascade, remember to organize them in such a way that you can tell when they can be archived (old internship postings, etc.). Also, if a file is a generic file that is updated each year, you can just give it a generic name, and then replace the existing file with your new one each time it’s updated instead of adding another version of the same file.
Examples:
- Bad: registration form 20190102.pdf (has spaces and a date in the filename)
- Bad: registration-form-NEW.pdf (eventually this will not be "new")
- Bad: registration-form-NEW2.pdf (this is what eventually happens when a version of the file already has the word "new" in it)
- Good: registration-form.pdf
- Navigate to your websites's "_files" folder.
- In the top-left corner of Cascade, select: Add Content > _ALL > File
- Name the file and place it in your website's "_files" folder.
- Click "choose" to browse your computer and select your document.
- Click "Submit" in the ellipsis.
Often we are making annual or regular updates to existing documents. Rather than create a new version of each year and having to remember to update links everywhere to go to the latest version, we recommend editing the existing document in place every year. For example, updating the file “org-chart.pdf” by editing it in place in Cascade each year, will be much easier than maintaining and updating dated files such as “org-chart-2020.pdf”.
Updating your existing document in place rather than creating a new one is ideal for multiple reasons:
- Prevents broken links. Editing your file in place means that the URL of your document will not change.
- Prevents confusing search results. Wouldn’t it be annoying for someone to find last year’s document instead of the current one? Editing your document in place ensures that the latest version will show up in search results.
- Reduces need for version control in Cascade. If there is no need for multiple versions of a document to be accessible to the public, then there is only one file to maintain!
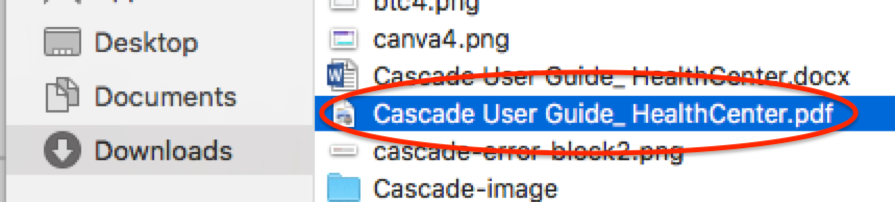
Step 1: Locate the existing document file
Navigate to your document in the Cascade system (ideally, documents like PDF and Word Document should be living in your "_files" folder).
Step 2: Update the document in place
NOTE: The original document already inside Cascade and the new document you wish to update it with MUST be the same file type. (ie. you cannot update a .docx file with a .pdf file)
- Click "Edit".
- Click "choose" to browse for your updated document on your computer.
- Click "Submit" in the ellipsis to save your changes. Your page should refresh and show the new version of the document you just uploaded.
Step 3: Publish the document
With the file updated in Cascade, make sure to publish your changes. By editing this file in place, the URL to your document does not change!