
If you are on a Built-In Multi-Block page, the built in Multi-Block is ready for you to edit, so there is no need to create a new Multi-Block. But if you need to add a Multi-Block to an EZ Page, or if you want to add additional Multi-Blocks to a Built-In Multi-Block page, read the "Creating Multi-Blocks" section of this documentation. However, the "Adding, Arranging, and Deleting Grid Cells" section is applicable to all situations.
Step 1: Create the multi-block
- Select: Add Content > _Responsive > Multi-Block
Step 2: Name the multi-block
A multi-block file name should reflect the page it will be on with a dash and a descriptor. For example, a multi-block that will be wired to an "About" page should be named about-content.
If there is more than one multi-block needed on a page, name them according to the type of content they contain for easy identification. For example, for an "About" page:
- a feed block should be named about-feeds
- a slideshow block should be named about-slideshow
- an announcement block should be named about-announcements
Naming multi-blocks this way helps show relationships between blocks and pages, which will make it easier to maintain in the future.
Enter the same name of the multi-block into the "Definition Block Name", "Display Name" and "Title" fields.

Placement Folder for Multi-Blocks (_blocks Folders)
You should always place multi-blocks within a "_blocks" folder. Depending on how small your website is, it is possible to only to have one _blocks folder; however, since most websites have hundreds of pages, we recommend to have a _blocks folder within each folder of your website. By doing so, you can better organize your multi-blocks and avoid sorting through hundreds of them within only one _blocks folder. Here is an example of a _blocks folder inside the arboretum folder and the arboretum exhibition subfolder:
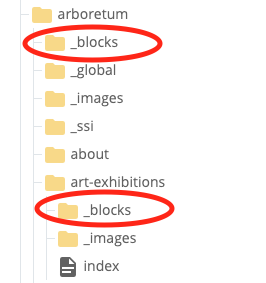
When you have "_blocks" folders in each directory of your site, they will be easier to locate and be closer to your pages. You will also have less naming problems. For example, if you have two pages with the same name but in different folders (for example people/index and about/index), you wouldn’t be able to name both content folders "index-blocks." Instead, you can create separate "_blocks" folders in the "people" and "about" folders. This way, you can name both content folders "index-blocks" because they are in different places and are still organized.
In the same window you named the multi-block, you will see a section for adding grid cells. A single multi-block can have many grid cells that will contain the content. Grid cells can be different widths (full-width, 2/3rds width, 1/2 width, 1/3rd width, and 1/4 width) and can contain different types of content, such as WYSIWYG, Action Links, Link Lists, and Videos.
Follow the steps below to add content to the content block via a grid cell:
1. Select a width for the grid cell

2. Choose a type of content within the multi-block and add content accordingly
Note: If you select "Yes" for more than one type of content, an error will appear on the page once you select "Submit." If this happens, navigate to your multi-block, select "Edit" in the top toolbar, and select "No" for the additional content within that grid cell.
You can add more content to the multi-block by adding more grid cells. For example, you can specify a single multi-block to have three grid cells, the first as a WYSIWYG full of text, the second as a Link List, and the third as an Action Link (the video above shows examples of those types of content).
To add a grid cell, click the green plus icon to add a second grid cell

To rearrange grid cells so that the content will appear in a certain order on the page, use the up or down arrows that appear near the green plus icon
To delete a grid cell, use the red X icon next to the green plus icon

Pro-Tip: Grid Cells
Avoid creating multiple multi-blocks, each with one grid cell. That is much more work! Just create additional grid cells and have everything in one multi-block.

