
Once a department is ready to begin recruitment for a vacant position, the hiring unit will need to create a posting in PageUp. Below is a guide to initiating postings, reviewing applications, and updating applicant statuses in PageUp. Please contact your Recruitment Specialist after reviewing this resource if you have additional questions or experience issues navigating the system.
On This Page:
- Before Beginning a Recruitment
- Accessing PageUp
- Setting Up the Job Card
- Position Information Section
- Search Committee Details Section
- Position Summary Information Section
- Posting Detail Information Section
- Advertising Details (Faculty and Staff Only) Section
- Select Application Type Section
- Users and Approvals Section
- Submit Your Posting for Review
- Checking the Status of a Created Posting
- Creating a New Posting from a Previous Posting
- Closing a Posting
- Accessing and Reviewing Applications
- Bulk Compiling Application Documents
- Updating Individual Applicant Statuses
- Bulk Updating Applicant Statuses
- Updating a Posting to Filled, Cancelled, or Unsuccessful
- Contact/Questions
PageUp Guide
Position Descriptions and Approvals
- All Classified positions must have a published position description in the PD App prior to beginning recruitment. Please contact your HR Consultant for more information about creating or updating an existing position description through Manager Self-Service in PeopleSoft.
- A position description must be on file for all Administrative and Professional Faculty positions. Please use the Administrative & Professional Faculty Job Description and Performance Evaluation to create a position description and email the document to your HR Consultant.
- Full-time positions in Academic Affairs must have an approved Recruit to Recruit (R2R) in place prior to beginning recruitment (excluding some grant-funded positions). Please contact leadership within your department/unit with questions on this approval process.
PageUp System Reminders
- Information entered will be saved each time you click the “Save a draft” button.
- Only click “Save and submit” or “Save & exit” once you are ready for your posting to go to HR for review and publishing.
- Need to access your existing PageUp account?
- Go to https://jmu.dc4.pageuppeople.com/
- Log in with your JMU credentials
- Don’t have a PageUp account?
- Contact your Recruitment Specialist to request an account
- Accounts are typically created upon request within 2 business days
- Need access to post a job under a different department?
- Contact your Recruitment Specialist to discuss access
-
Click the “New Job” button in the jobs panel of the home dashboard

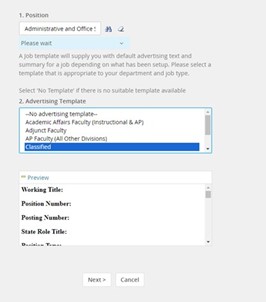
- Fill out the “Position” field:
- For Classified/Wage, enter the correct state role title for the open position
- For all other position types (Instructional Faculty, AP Faculty, Graduate Assistant, etc.), enter the position type
- Select the correct position type in the “Advertising Template” field
-
Click “Next >”; proceed to Filling out the Job Card (below)
- Some fields will be pre-filled on this screen based on the position type and template selected on the previous For example, Classified postings will have the state role title, position type, position status, and pay band information pre-filled
-
The “Working Title” field will pre-fill with the state role title selected on the previous page
-
For Classified/Wage postings, cut this information in the “Working Title” field and paste it into the “State Role Title” field directly underneath
-
For Instructional and AP Faculty postings, the “State Role Title” field will pre-fill as “N/A”; replace the “Working Title” field with the correct working title of the position
-
-
Complete all remaining fields in this section
-
Add the Search Committee Chair by typing in their first and last name and click out of the box; at this point their JMU email should populate in the blue box beneath the field
-
If the correct JMU email does not populate, click the magnifying glass to the left of the box and search for the person by their first/last name in the pop-up search menu

-
Click the “Add Search Committee Member” button to add all other committee members
-
This will lead to another pop-up menu where committee members can be searched by name; add members to the committee by clicking the “Add” button to the right of their name

-
If a search committee member doesn’t have a PageUp account yet, they can be added with their name and JMU email by clicking “Add new search committee member” at the bottom of the pop-up search menu

-
Note that committee members will not receive an automated email when they are added to a posting; be sure to communicate with the committee
Fill out the posting’s general information, duties and responsibilities, qualifications, and any additional posting information in the assigned text boxes
-
Enter the Posting Date
-
All efforts are made to post your position within 2 business days of submission; your HR Recruitment Specialist will shift this date forward as needed based on actual date of posting
-
-
Enter the Beginning Review Date
-
Classified and Wage positions must be posted for a minimum of 7 calendar days, after which you may begin reviewing applications and/or close the posting
-
Instructional Faculty and AP Faculty positions must be posted for a minimum of 30 calendar days, after which you may begin reviewing applications and/or close the posting
-
-
Enter the Closing Date (if applicable)
-
Enter 11:55 pm for any posting with a set close date; this will be the consistent close time for all postings
-
-
If the department would like the posting to be open until filled, select “yes” for “Open Until Filled” and leave the “Closing Date” fields blank
-
“Open Until Filled” means the posting will remain open until the department determines they would like to close the posting, rather than having a pre-set automatic closing date
-
-
Enter the Proposed Starting Date

-
Select any external advertising requested for the recruitment
-
Your HR Recruitment Specialist will work on securing advertising quotes for any platform selected after the posting is live
-
-
If your department is interested in a print/display ad or an ad location not listed, note this in the “Please list any other sources” text field

-
The correct application form should pre-fill in the “form” field, depending on the position type
-
Add any necessary applicant documents (resume, CV, cover letter) by clicking the “Add Documents Needed to Apply” button

-
This will prompt a pop-up library of application document types
-
Select the necessary documents being requested for the recruitment and click “Save” at the bottom of the menu
-

-
Fill out the “Initiator” field; the Initiator is the individual creating the posting
-
Fill out the “Hiring Manager” field; the Hiring Manager is the supervisor of the position
-
The “Hiring Manager” field will pre-fill with name of the individual creating the posting; if this is incorrect for the posting, be sure to delete out your name and enter the correct person
-
-
Select the correct Approval Process from the drop-down menu
-
“Faculty & Staff” is the correct approval process for all Faculty, Classified, and Wage recruitments
-
-
The HR Recruitment Specialist field will pre-fill as Jobs@JMU for all Faculty & Staff Approval processes
-
Leave this field as is; the HR Recruitment Team will direct the posting to the correct person after the posting is submitted for review
-

-
At the bottom of the posting, select “Save a Draft” to save a partial draft and return to it later
-
To submit your posting for review and publishing, click the blue “Save and submit” button
-
Faculty and staff postings: your HR Recruitment Specialist will review the posting and reach out if additional information is needed
-
Every effort is made to post Faculty and Staff positions within 2 business days of submission; your Recruitment Specialist will reach out during this time frame with any questions or if additional information is needed to proceed
-
-
Student postings: The Office of Student Employment will review/approve your posting; please reach out to their office with any questions
-
Graduate Assistant postings: The Graduate School will review/post your posting; please reach out to their office with any questions

-
To check the status of a posting you have created, navigate to your open jobs by selecting “ Jobs open” from your PageUp dashboard

-
Find the job you wish to view
-
The Status column will show if your posting is submitted to HR for review
-
Click “View Job” to see the posting details again
-
![]()
-
To use a previous PageUp posting as a template to pre-populate some fields from that previous posting, navigate to the top of the job card you would like to copy
-
To the right of the Working Title of the posting, click on the “…” button
-
Click “Copy job” from the drop down to create a duplicate of the job card to use for a new posting
-
Any necessary updates to the posting should be made in the duplicate job card before submitting for review

When to close a posting:
- Postings should be closed once there is an adequate applicant pool
- Classified and Wage postings must remain open for 7 consecutive calendar days
- AP and Instructional Faculty postings must remain open for 30 consecutive calendar days
- Student and Graduate Assistant postings have no minimum requirement
- HR recommends closing the posting once you start interviewing applicants
- You must screen and consider all applicants who apply, not just those individuals who had applied when you started reviewing or interviewing candidates, so be mindful of when it is appropriate to close your posting to ensure every applicant is equally given consideration
Closing Date vs. Open Until Filled:
- Postings with a specified close date will close on the date and time indicated in the Closing Date field
- Postings marked “Open Until Filled” will not close until the posting initiator closes the posting any time on or after the listed Begin Review Date
To close a posting:
- In the “New job” panel of the PageUp home dashboard, click “Jobs Open”

- Click the “Sourcing” tab

- In the sourcing tab, there will be one “source” listed
- Click the “Actions” drop-down menu and select “Edit"
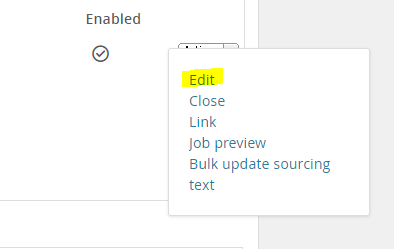
- In the sourcing channel pop-out window that appears, enter the date/time the posting should close

- In the “Applicant Progress Board” panel, click “Review applications”
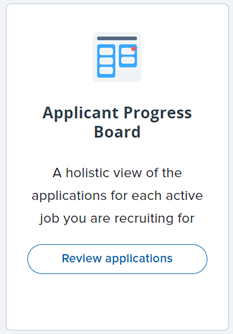
- Toggle to the correct posting’s applicant pool by selecting the correct posting title in the drop-down menu in the upper left corner of the board
- In the list of applicants for the selected posting, click the "Form” button beside an applicant’s name to view their completed application

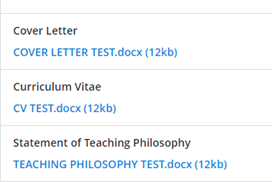
- In the full application form, scroll to the section where the application documents are linked
- Click the name of each document to download and view the documents
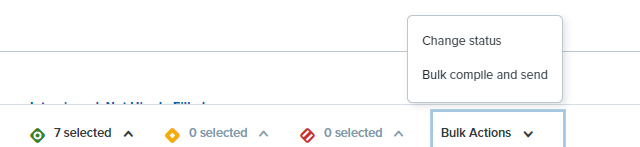
- In the Applicant Progress Board, mark all the applicants that you would like to compile documents for with the same color

- At the bottom of the screen, click “Bulk Actions” then “Bulk compile and send”
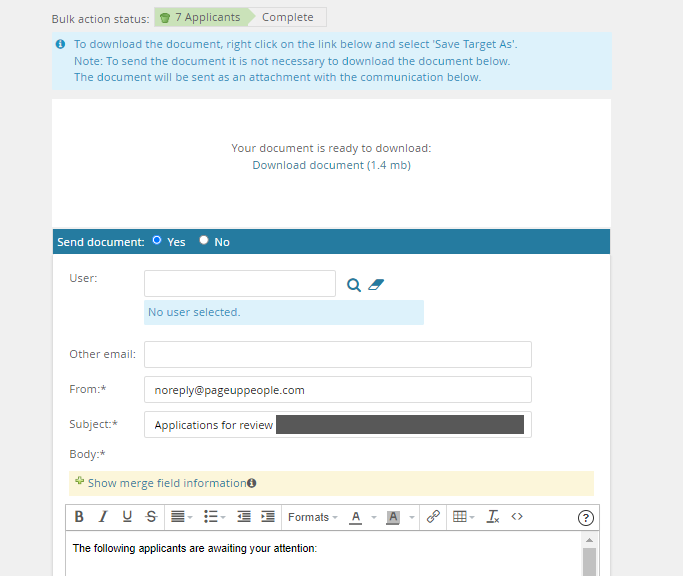
- In the following menu, select only “Application form” and “Supporting Applicant documents,” then click “Create PDF”

- The PDF will take a moment to generate on the following screen; the screen will update you as the documents are converted
- After the PDF is generated, you will be routed to the below screen; click “Download document”
- You may disregard the rest of the screen including the email template; once you have clicked to download the document, you may close this screen
- In the Applicant Progress Board, each applicant panel contains buttons stating “progress” and “declined.” These buttons can be used to update individual applicants.
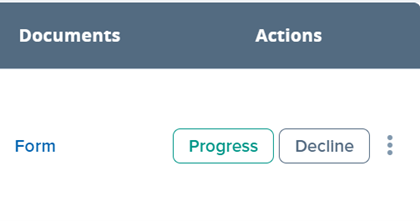
- For example, if you did not interview a candidate, you will click “progress” or “decline” (the buttons perform the same function).
- Then, click “Select Other” to see the comprehensive list of applicant statuses.
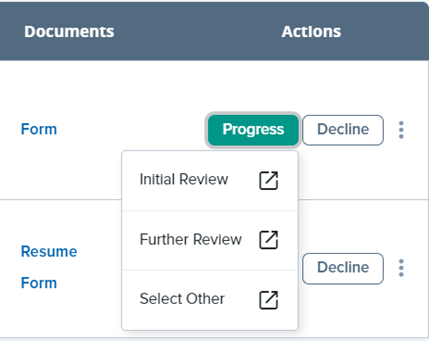
- Here, select the appropriate applicant status from the list and then click “Next >”.
- **To complete a recruitment, all applicants must be moved to a final status (“Not interviewed”, “Interviewed, Not Hired, Hired”, “Offer Rejected”, or “Offer Rescinded”).
- ** Several statuses also correspond to the recruitment status (“Filled”, “Cancelled”, or “Unsuccessful”). Please be sure that the selected status also matches the recruitment status if applicable.
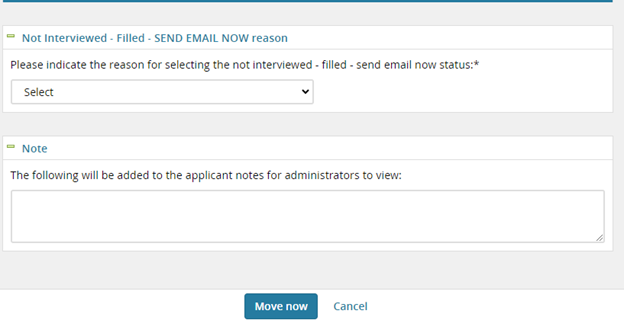
- ** When completing a recruitment, be sure to select statuses that end in “SEND EMAIL NOW” for any applicant not interviewed, as this will send out a generated email to the applicant letting them know of the recruitment’s status.

- On the next ‘confirm status change’ screen, please disregard/do not edit the fields from ‘communication template’ through ‘additional users from job’ as these will pre-fill correctly based on the status you selected
- For several statuses, you will be asked to provide a reason for the status update. Select the accurate reason for the update on the below menu if prompted, then click “Move now.”
- You may also update multiple applicants’ statuses at once. To move applicants to the same status, first group them together using the green/yellow/red diamonds to the left of the applicants’ names.
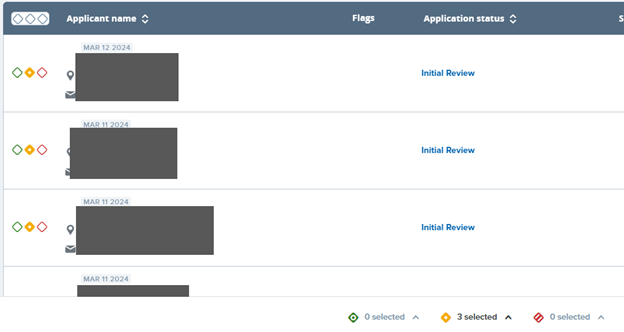
- At the bottom of the screen, a menu for the diamonds will appear. Click the “^” menu beside the group that you would like to update.
- Click “Change status.”
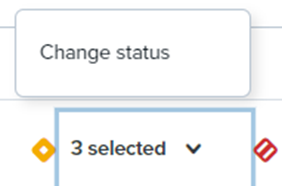
- In the “Application status” drop down menu, please select the correct status for the group of applicants.
- **To complete a recruitment, all applicants must be moved to a final status (“Not interviewed”, “Interviewed, Not Hired”, “Hired”, “Offer Rejected”, or “Offer Rescinded”).
- ** Several statuses also correspond to the recruitment status (“Filled”, “Cancelled”, or “Unsuccessful”). Please be sure that the selected status also matches the recruitment status if applicable.
- ** When completing a recruitment, be sure to select statuses that end in “SEND EMAIL NOW” for any applicant not interviewed, as this will send out a generated email to the applicant letting them know of the recruitment’s status.

- Click “Next”.
- On the next screen, please disregard/do not edit the fields from ‘communication template’ through ‘additional users from job’ as these will pre-fill correctly based on the status you selected.
- For several statuses, you will be asked to provide a reason for the status update. Select the accurate reason for the update on the below menu if prompted, then click “Move now.” Please be sure all reasons align accurately with the applicant.
- Click “Move Now”

- All applicant statuses must first be updated (see Updating Applicant Statuses)
- Once all applicant statuses are updated, please submit the finalize a posting request form
- Your submitted form will be reviewed and your posting will be updated accordingly by the appropriate office within two business days
-
For questions about navigating PageUp contact your HR Recruitment Specialist
-
For questions about faculty and staff postings/recruitment contact your HR Recruitment Specialist
-
For questions about student postings contact The Office of Student Employment
-
For questions about Graduate Assistant postings contact The Graduate School