After selecting your template, follow this guide to edit the placeholder content to meet your specific needs and customize it for your department/sender.
Keep in mind that your selected template is a starting point - we will also review how to move, delete, and add more elements to your email template.
New Email: After initially creating your email and selecting a template, you will automatically be sent to the Email Builder.
Existing Email: You can return to the Email Builder by finding your email in Email Drafts and clicking "Edit Content".

Step 1: Update the Header
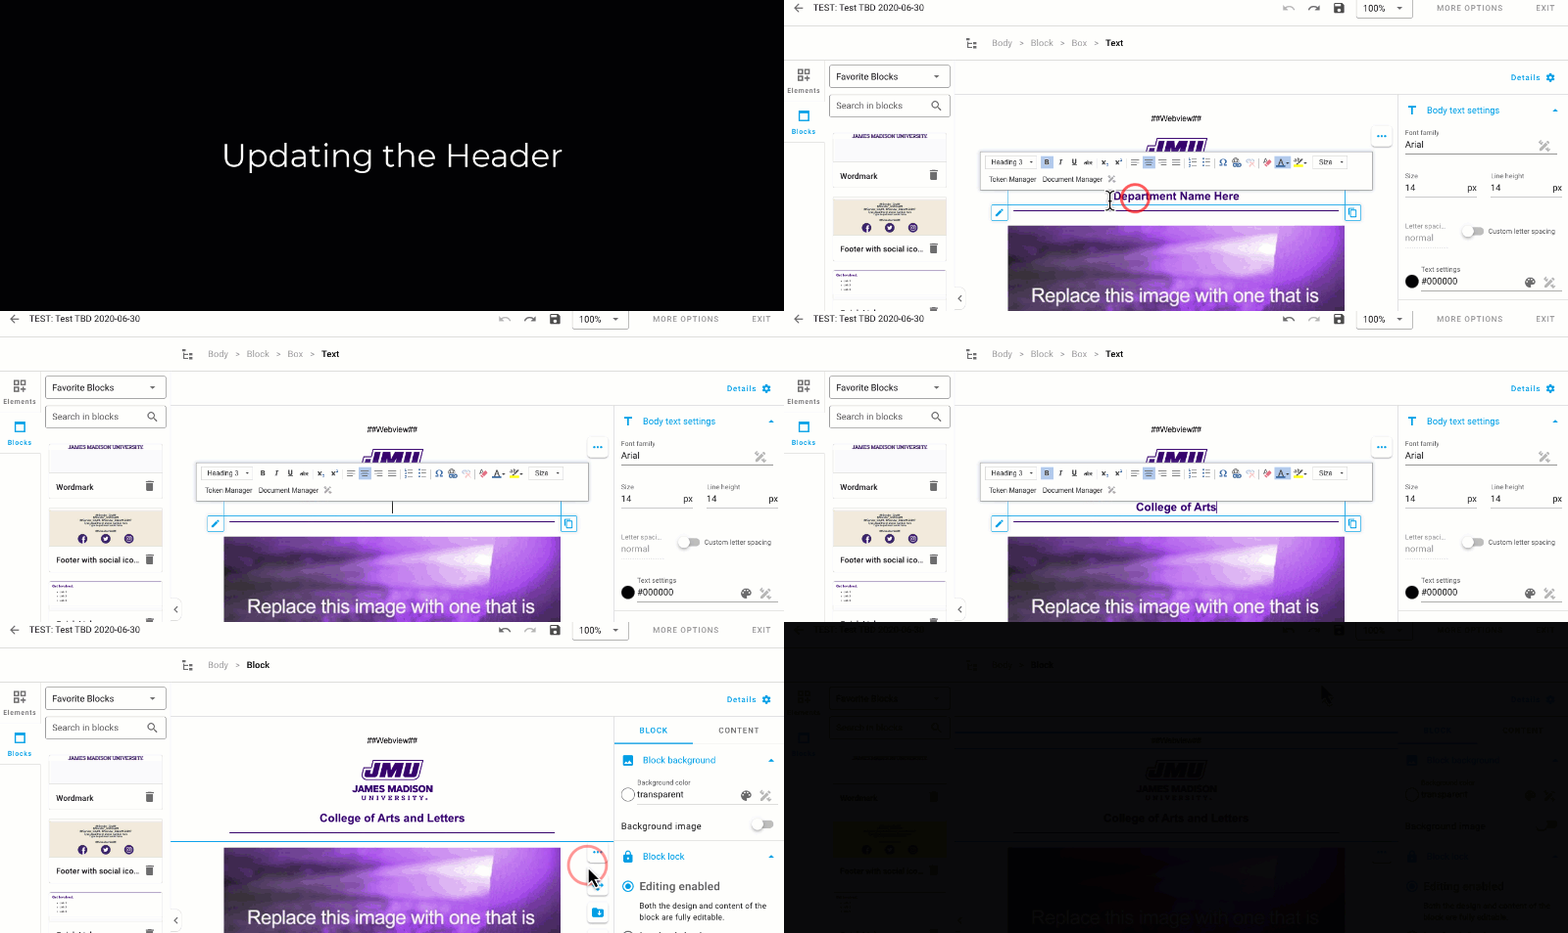
The email header contains the JMU block logo followed by the sending department's name. Update the placeholder text "Department Name" or "Newsletter Title Here" to the appropriate department/sender name or newsletter title.
Note: Unless otherwise arranged, the JMU block logo should never be removed. Emails must be able to be easily identified as coming from a specific JMU sender.
DO NOT remove the ##Webview## token that appears at the top.
Step 2: Replace Placeholder Graphics
- Double click the placeholder graphic to open the Image Manager.
- Navigate to your department's folder to upload or select your image.
- Upload a new image:
- Navigate within the Image Manager to your department folder and where you wish to upload your image.
- Click the "Upload" button at the top of the Image Manager.
- For images that are email-specific, you need to upload it to the "email-specific" folder of your department. (ex. "Advancement/email-specific/2020")
- For images that you may use with another email in your campaign, upload it to a campaign folder inside your department folder. (ex. "Advancement/madison-magazine")
-
- Use the Upload window to browse for the image on your computer. You may click "Add" to upload additional photos at once.
- Click the "Insert" button. This will take you back to the email editor and insert your image.
- Add alternative text for your image.
- Select an existing image:
- Find and select your image in the Image Manager.
- Click the "Insert" button. This will take you back to the email editor and insert your image.
- Add alternative text for your image.
NOTE: Each placeholder graphic shows the required dimensions for your photo.

Step 3: Edit Text
- Double click a text box and begin typing OR copy and paste existing text.
- Click outside of the text box to commit your changes.
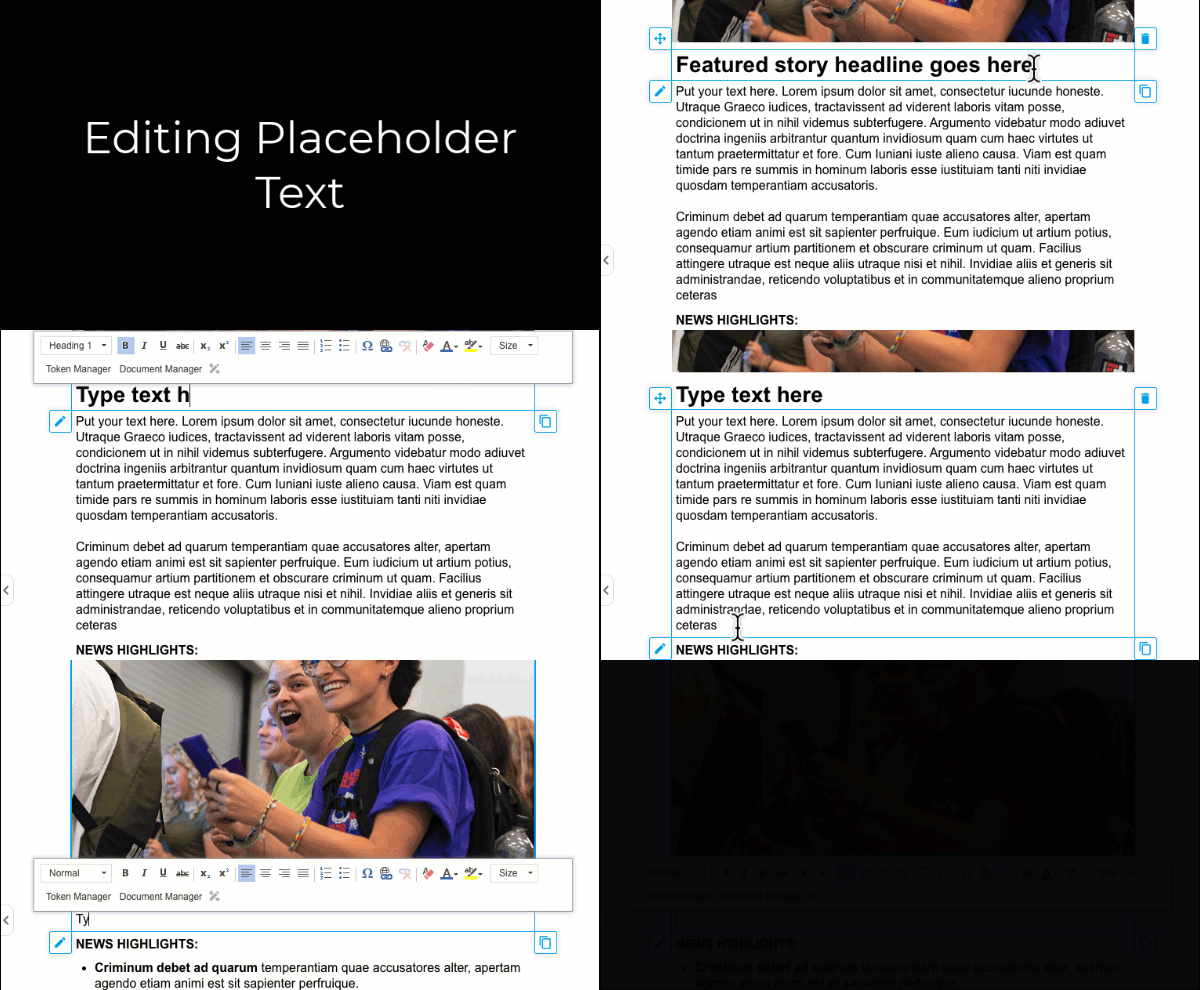
Formatting Tools: From the text editing toolbar that appears, you may choose to format your text by adjusting using the Heading style menu, Bold, Italics, Paragraph Alignment (left, center, right), numbered lists or bulleted lists, special characters and converting your text into a link. These options are highlighted below. DO NOT underline your text - underlined text is commonly understood as a link. Also DO NOT change the font from what is already specified.

NOTE: The placeholder text and Heading styles in templates and Favorite Blocks is already formatted to University standards. The font size, style, spacing, or colors should not be modified.
When Copying/Pasting from a Word Document, you must remove any existing formatting: Copy and paste your text from Word into a text box. Then, select your pasted text and click the "Remove Format" button. ![]()
Create Text Links
Text links can be applied to any text within an email using the "Link" button in the text editing toolbar:
![]()
Create a New Text Link:
- Select the specific word(s) or phrase(s) you wish to link. This text will become the Display Text for your link.
- In the text editor, click the "Link" button to open the link editing window.
- If necessary, make edits to the Display Text or Link Type.
- Copy and paste the full URL for your link into the URL field. The Protocol field may update depending on the URL that is used.
- Click OK to apply your changes.
Mail-to Links
A "mail-to" link is a type of link that automatically opens a new email in the reader's default email client, such as Outlook or Gmail, and pre-fills the "To" email address. Mail-to links are great when you want emails on certain topics to go to a designated email address.
Any link can be a mail-to link:
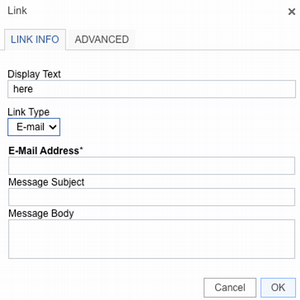 Text Mail-to Links:
- In the Link editor, change the Link Type to "E-mail".
- Add the desired mail-to email address to the E-mail Address field.
- Click OK to apply your changes.
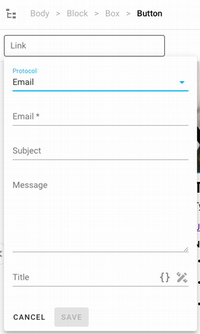
- Select your button.
- In the top left corner of the email editor you will see a field called "Link". Click here to view the editable fields for your button link.
- Change the Prototocol to "Email".
- Add the desired mail-to email address to the E-mail field.
- Click Save to apply your link to the button.
Calendar Links
From the Favorite Blocks menu, you may add a "Calendar Links" block to your email. You will then need to link the images to the correct URL.
Google Calendar Link: Use this tool to generate an add-to-calendar link for Google: https://www.labnol.org/calendar/ The beginning of the URL should look like this: "https://calendar.google.com/calendar/u/0/r/eventedit?XXXXX"
Outlook and iCal: You will need to create an .ics file and make it available on www.jmu.edu (upload it as a file in Cascade to a safe space). To create a .ics file, we recommend using this tool: https://ical.marudot.com/
PRO TIP: You may also pre-populate the response email's subject line and message for the recipient. For example, if you are embedding an email address button for RSVP responses, you might choose the event's name as the subject line and "I am attending this event" as the response message.
Step 3: Create/Edit Calls to Action
Buttons in emails are clear Calls to Action (CTAs), directing the reader to take a specific action (ie. read more on a webpage, sign up for a mailing list, share feedback etc). Our templates include placeholder buttons that you can edit to fit your email message's call to action.
With CTAs, fewer is better. We recommend having one clear CTA. Generally, the more options you provide your reader in terms of buttons and links, the less total engagement you will have in your email. It's behavioral psychology - the more options provided, the less likely a person is to the particular action you want. You should also avoid having multiple links in your email going to the same content. Read more about email CTAs.
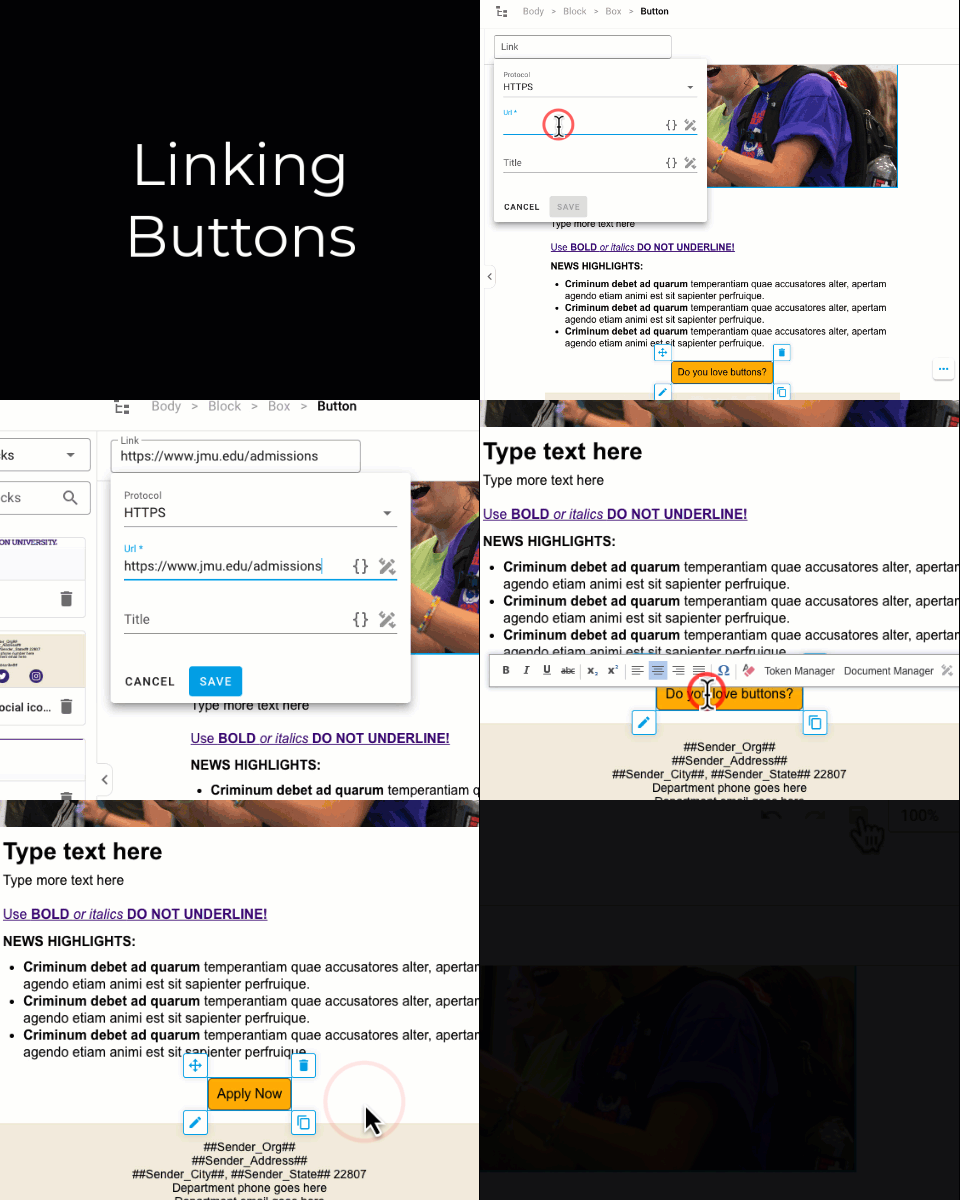
Add a Link to a Button:
- Select a Button element in your template (or insert one from Favorite Blocks).
- In the top left corner of the email editor you will see a field called "Link". Click here to view the editable fields for your button link.
- Type or paste your desired link into the URL field.
- Type a useful Title for this link in the Title field. The Title helps clarify or further describe the purpose of a link before the user clicks on it, often in the form of a tooltip visible when hovering over the link.
- Click Save to apply your link to the button.
- To edit the visible button text, double click on the button to open the text editor. Make your text changes.
- Click away from the button to apply your text changes.
- Verify that you button is linked appropriately and save your email.
The footer contains tokens surrounded by hashtags which pre-populate most of the sender's information based on what is selected in the "Email Details" section. This means the information surrounded by hashtags will be completed for you - do not delete these token fields!
YOU MUST: Add or edit department/sender phone number & email address as this information may change from email to email. Simply add your phone number and email address where the placeholder text prompts you.
DO NOT delete the ##Unsubscribe## token that appears in the footer.

YOU MAY: Link the social media icons to your departments social media accounts by selecting the icon and editing the Link field that appears at the top of the page. DO NOT add or delete any social icons. The template depends on there being 3 social icons in the footer. You may replace an icon, however. For example, if you have a LinkedIn account you may replace one of the icons with the LinkedIn icon.
The social icon images are located in the "shared/social-icons" folder. Only use the purple icons.
Template placeholder content should meet the needs of most emails. However, you may use these features to place additional elements if necessary.
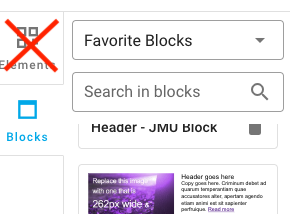
Favorite Blocks
Unversity Marketing & Branding has created and tested saved elements for you to use in the Favorite Blocks menu to the left of the email editor screen. These elements can be easily edited to suit your email needs.
Favorite Blocks include buttons, images, text boxes, dividers and other commonly used email elements.
NOTE: You may not customize or modify the existing email template using any other tools that appear in the "Elements" section on the left of the email editor screen. Only items available in Favorite Blocks have been tested to work across all email clients and meet our University Brand Guidelines.
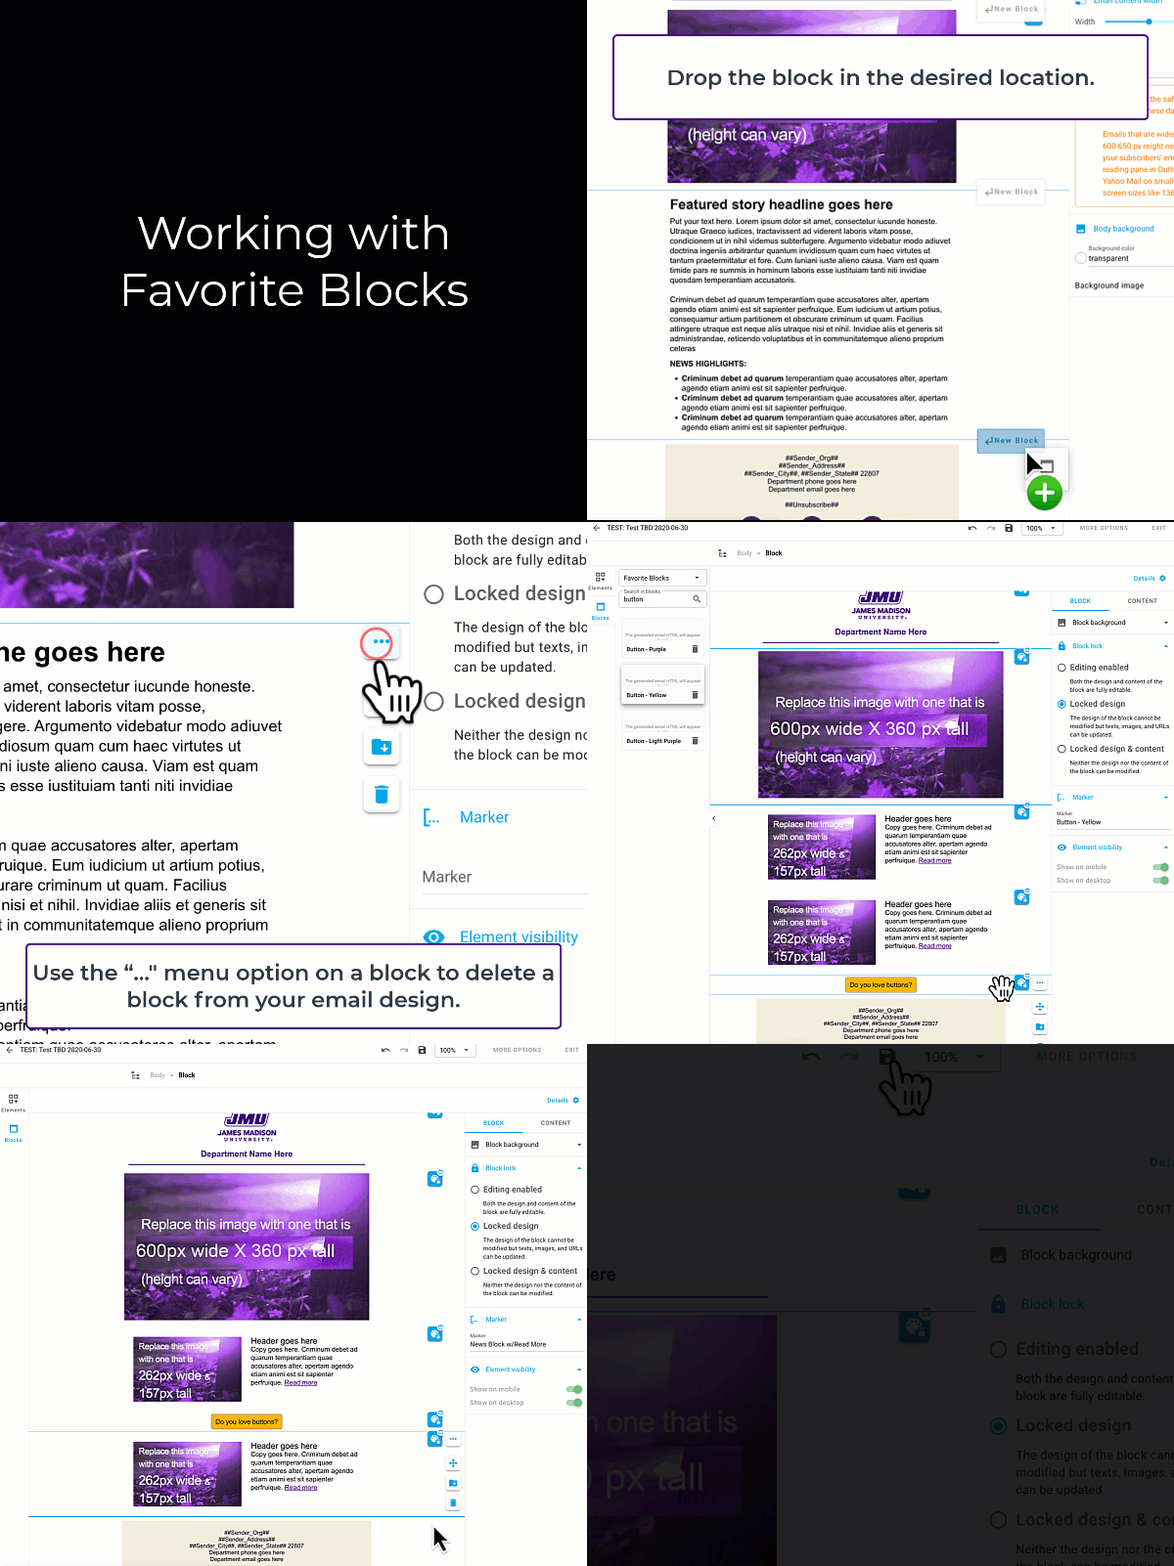
Adding content from Favorite Blocks:
- From the Favorite Blocks menu to the left of the email editor, click and drag the element you want to add from the menu onto your email.
- Drag the element over any grey "New Block" space until it turns blue. Release your mouse to drop the element in that location.
- Edit the text, images, links, etc. in the added content block. DO NOT change the font or change any colors of text.
WARNING: DO NOT delete blocks from the Favorite Blocks menu - this will delete the element from iModules, making it unavailable to other users!
Moving elements
Moving Elements inside a Block:
- Select the element you want to move. A blue bounding box will appear aorund the element.
- Use the Directional Arrow icon to drag and drop the element to a new location inside the block.
NOTE: To ensure your email's proper layout on mobile devices, ONLY move elements up or down. DO NOT place elements to the left or right of another element.
Moving an entire Block:
- Select the block you want to move. Blue bounding lines will appear above and below your selected block.
- Open the "..." menu for the block and use the Directional Arrow icon to drag and drop your block in a new location.

Deleting elements:
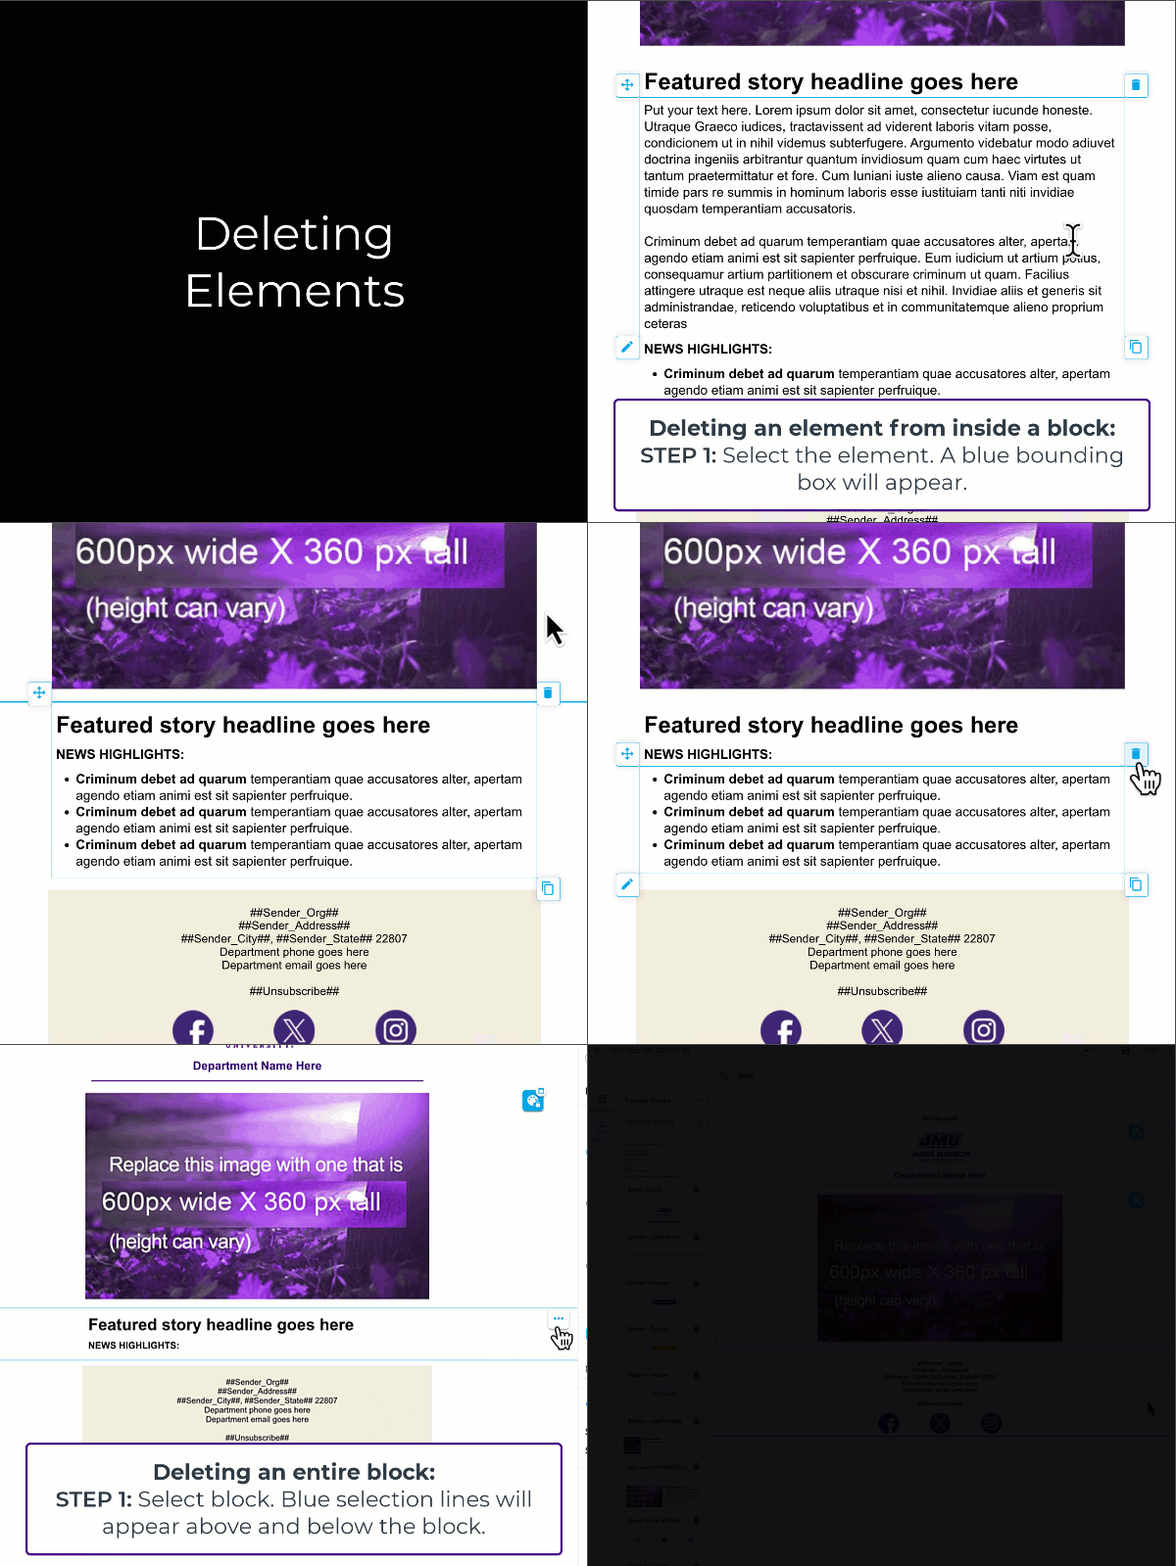
Deleting Elements inside a Block:
- Select the element you want to delete. A blue bounding box will appear around the element.
- Click the Trash icon on the bounding box to delete the element from the block.
Deleting an entire Block:
- Select the block you want to delete. Blue bounding lines will appear above and below your selected block.
- Open the "..." menu for the block and select the Trash icon to delete the entire block.
NOTE: Deleting an entire block will delete all elements contained inside of that block.
Pro Tip: Verify your selection
Not sure what you're about to move or delete? You can verify your selection in the breadcrumbs at the top of the email editor. This may be helpful to see what you are selecting (ie. a text box vs. the entire block containing that text box).

Breadcrumbs when the block is selected.

Breadcrumbs when the text area inside the block is selected.
Pro-Tip: Undo/Redo an Action
![]()
At any point as you are editing your email content, you can use the Undo and Redo Buttons near the top right of the email editor to undo or redo your last action.


