
Creating a PDF from a Word document is likely easier than you think—especially if the source or original document was designed with accessibility in mind.
For help creating an accessible source document, refer to the Creating Accessible Files in Microsoft Word guide.
STEP 1: Review accessibility of the source document
Before exporting your Word document to PDF, review it for accessibility using Microsoft Word’s built-in Accessibility Checker. Addressing accessibility issues in the Word file is much easier than correcting them after the document has been converted to PDF.
HOW TO: Check for accessibility in Word
Windows Users:
- Click File > Info.
- If the Accessibility Checker sees any potential issues, you will see a message next to the Check for Issues button.
- To view and repair the issues in your file, click Check for Issues > Check Accessibility.
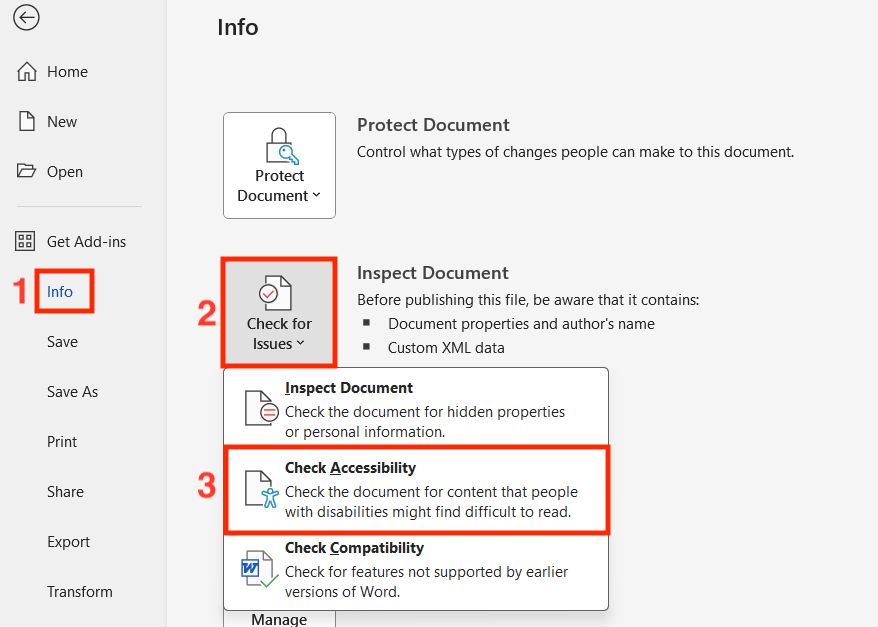
- Click a specific issue to see Additional Information and steps you can take to change the content.
Mac Users:
- Open the Review tab in the ribbon.
- Click Check Accessibility.

- The Accessibilty Assistant window will open on the right side of the screen.
- Click a specific issue to see more information and steps you can take to change the content.
Accessibility Checker Issues
The Accessibility Checker checks a file against a set of possible issues that people who have disabilities might experience in the file. Each issue is classified as an Error, Warning, or Tip.
- Error: An error is for content that makes a file very difficult or impossible for people with disabilities to understand.
- Warning: A warning is for content that in most, but not all, cases makes a file difficult for people with disabilities to understand.
- Tip: A tip is for content that people with disabilities can understand, but that might be better organized or presented in a way that would improve their experience.
STEP 2: Export Word document as a PDF
After correcting any accessibility issues identified in the source Word document, follow the instructions below to export it as a PDF.
Methods to Avoid:
DO NOT use Print to PDF or "Save As" PDF to convert your Word documents. These methods lose some of the accessibility information and are often harder to review and repair in Acrobat Pro.
HOW TO: Export Word Documents as PDFs
Windows Users:
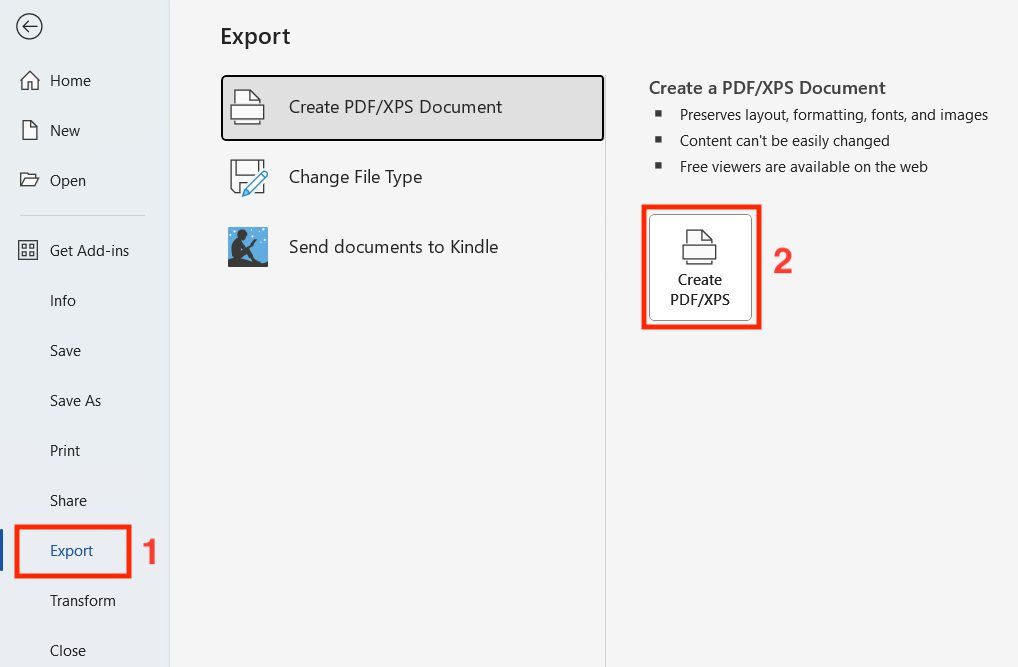
- Click the File tab, and then click Export.
- Select the Create PDF/XPS icon.
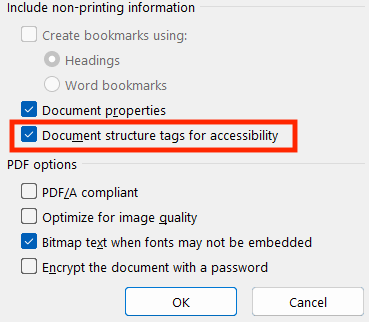
- In the export dialog, click Options.
- Make sure that the Document structure tags for accessibility check box is selected, and then click OK.
- Click Save
MAC Users:
IMPORTANT: To export a PDF form Word on a Mac, you must first have Adobe Acrobat Pro installed on your machine and be logged into Adobe's Creative Cloud service. This is the only way to preserve the accessibility features of your source document.
When you install Acrobat Pro on your computer, Adobe will also install an add-in that allows you to create a PDF without leaving Word or PowerPoint. You will know it is installed when you see the Acrobat tab on the application’s ribbon.
- In the Acrobat tab in the ribbon, click "Create PDF".
- The Adobe Acrobat application will then open with your newly created PDF file.
- Save your file.
Adobe Acrobat Pro:
While other free software offers minimal editing capabilities, Adobe Acrobat Pro is the most robust tool for reviewing and remediate accessibility issues in PDF documents.
IMPORTANT: Adobe Acrobat Pro is part of the Adobe Creative Cloud software suite. Information about purchasing licenses for Adobe Creative Cloud is available on JMU IT's Enterprise Software Agreements page. There are also locations on campus with Creative Cloud software.
HOW TO: Check Accessibility in Adobe Acrobat Pro
- Open the PDF in Adobe Acrobat Pro.
- Go to "Tools" > "Accessibility" to access accessibility features.
- Click "Accessibility Check" to run an automated scan for common issues such as missing alt text, improper reading order, or lacking document structure.
- Review the results in the Accessibility Checker panel and address any flagged issues.
Coming soon - Remediating Accessibility Issues in PDF - a detailed guidance for existing PDFs in Adobe Acrobat Pro for accessibility is under development.