Establishing a connection
Note: You may need to clear SFTP/FTPS Cache or known hosts in Fetch before trying to connect to JMU servers. Before you can begin exchanging files with a site, you need to connect to that site. Connecting with Fetch is fairly easy, provided that you know the address of the site that you want to connect to:
- After you start Fetch, the Open Connection... dialog box should appear automatically. If you are already in Fetch and the dialog box is not visible, click the Open Connection... button in the main window to make it appear.
- Enter the address of the host that you want to connect to in the Host field. (Example: www.jmu.edu)
- Change Connect Using to SFTP
- Type in the login name that you want to use in the appropriate field. If you do not specify one, Fetch will use "anonymous" to log in. Note that this is your login on the system you are attempting to connect to, and not necessarily the one that you use on University computer systems.
- Type in your password in the Password field. If you do not specify one, Fetch will substitute the password listed in the Preferences dialog under Default Password. (For complete information about preferences,consult the full Fetch documentation.)
Click OK button to complete your connection.
Retrieving a file from the remote system (getting)
In order to retrieve a single file from the remote system, double-click on its name. Fetch will prompt you about where you want to save it on your (local) computer, and it will then start the transfer.
You may also have noticed that there is a set of three buttons in the main window: Automatic, Text, and Binary. In most cases, you will want to leave these buttons on their default setting of Automatic. This will instruct Fetch to automatically select the format in which it should transfer the file, based on its own "best guess" as to the file's contents.
Storing a file on the remote system (putting)
- Click on Put File
- Select a file from the dialog box.
- Give the file a name for the remote system.
This step will control how the file will appear in the remote system's directory. In many cases, you can just accept the default name the Fetch assigns the file. Fetch will also ask you about the format that you want to send the file in. Again, in most cases, you should accept the default.
Changing directories
If you are familiar with the way that the Macintosh usually presents files and folders, working with Fetch should have a familiar feel. After you connect to a site, Fetch displays the contents of the current directory in the file list box and the name of that directory immediately above the list box.
- To move to a directory above the directory you currently see, click on the name of the current directory (above the list box). Select the directory that you want to go to from the menu.
If you want to move down to subdirectories, double-click on the name of the directory that you want to open in the main file list.
Closing Fetch
If you want to leave the Fetch program, select Quit from the File menu.
If you want to close the connection that you presently have but remain in the Fetch program (so that you can open another connection), click on the Close Connection button.
(The Open Connection button becomes the Close Connection button while a connection is in progress.)
Abandoning File Transfers
If you want to abort an ongoing file transfer, but want to maintain the connection to the host system, press the Cancel button.
As the Fetch documentation explains, however, some "host computers do not recognize the cancel command and will therefore continue the current operation until it is completed."
Passive Mode Transfers
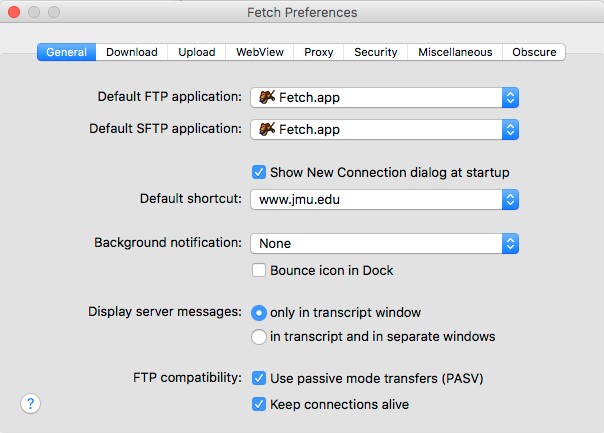
Go to Fetch - Preferences in the menu bar for Fetch and check on the General tab an check ON the checkbox for Passive Transfers at the last section under FTP Compatability:

